Unlocking the secrets of photo editing can feel like discovering a new world. Working with layers and masks is your golden ticket to transforming ordinary images into stunning visual masterpieces.
Imagine having the power to adjust, enhance, and manipulate elements in your photos with precision and creativity. This guide is your chance to dive deep into these essential tools, giving you the skills to turn your creative visions into reality.
Ready to elevate your editing game and unleash your potential? Let’s explore how layers and masks can revolutionize the way you work with images. You won’t want to miss a single tip.
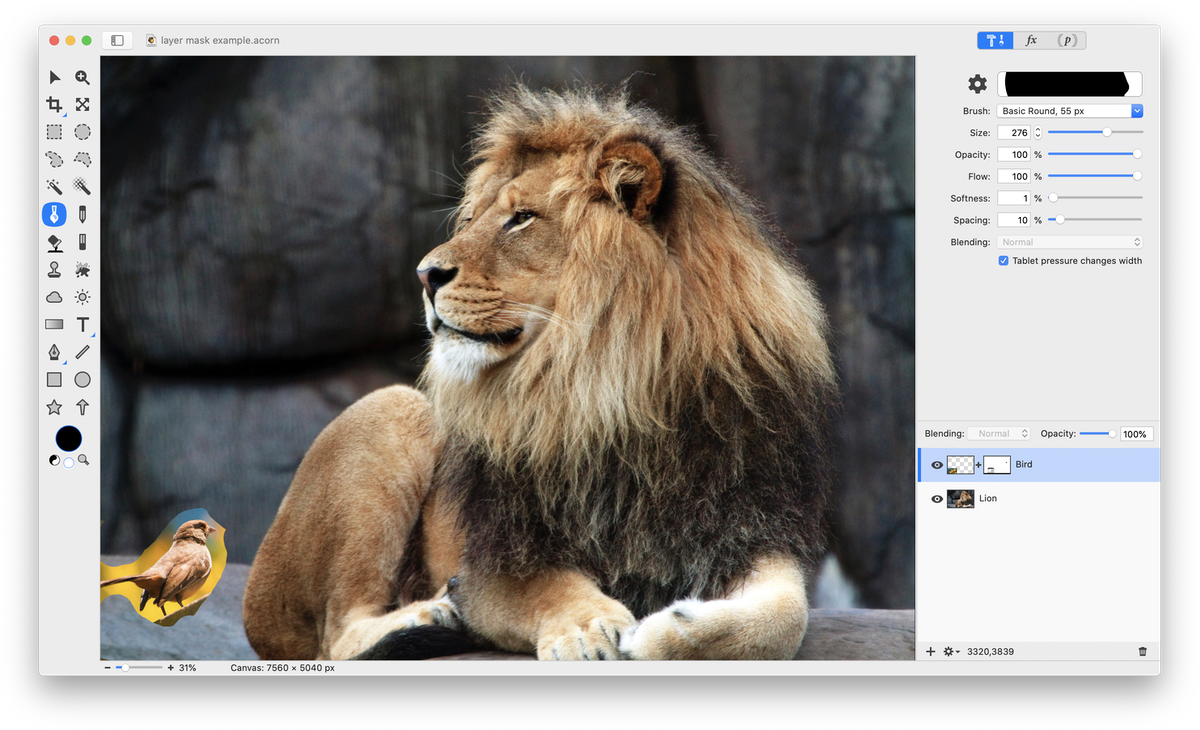
Credit: flyingmeat.com
Layer Basics
Explore the essentials of working with layers and masks in digital editing. Layers allow you to organize and separate elements, while masks provide control over visibility. This combination offers flexibility and precision in your creative projects.
When diving into the world of digital design, understanding the basics of layers is crucial. Layers act like transparent sheets on which you can add different elements without affecting others. Imagine them as your creative playground. They allow you to experiment and modify without fear. You’re free to add, remove, or adjust each element independently, providing ultimate flexibility in your design process.Understanding Layers
Layers are foundational in digital editing software like Photoshop. Each layer can hold images, text, or shapes. This means you can edit one part of your design without touching the others. Think of it like organizing files on your computer—you wouldn’t want all your documents in one folder, right? Layers help you keep everything neat and organized. Ever wondered how professionals achieve those stunning, complex designs? The secret is in mastering layers. When you grasp how layers work, you’ll find your creativity has no bounds.Types Of Layers
There are several types of layers, each serving a unique purpose. The most common are image layers, which hold pictures or graphics. If you want to add text, you’ll use text layers. These allow you to edit fonts, sizes, and colors separately from other elements. Adjustment layers are another powerful tool. They let you tweak colors and brightness without altering the original image. It’s like having a magic wand to enhance your design. Have you tried using shape layers? They’re perfect for adding geometric elements. Shapes like circles, squares, and lines can give your design structure and focus. Understanding these layer types will empower your creative process. It transforms your design approach from a single canvas to a dynamic, multi-layered masterpiece. So, how will you use layers to elevate your next project?Creating And Managing Layers
Creating and managing layers is crucial in digital design. Layers help organize different elements in a project. This method allows for easy edits and adjustments without affecting the whole image. Understanding layers can significantly enhance your design workflow. Let’s dive into the essential aspects of working with layers.
Adding New Layers
Adding new layers is simple. Open your design software and locate the layers panel. Click on the “new layer” icon. This action creates a fresh layer above the current one. You can draw or add elements on this new layer. It helps keep parts of your project separate. This separation allows for easy changes later.
Organizing Layer Order
Layer order affects visibility in a project. Higher layers appear above lower ones. To rearrange, click and drag the layer to a new position. This method helps prioritize which elements are seen first. Always keep important elements on top layers. This ensures they are not hidden.
Grouping Layers
Grouping layers is effective for organizing related elements. Select multiple layers by holding the shift key. Right-click and select “group layers.” This action creates a folder-like structure in the layers panel. Grouping helps manage complex projects efficiently. It reduces clutter and keeps the workspace clean.
Layer Styles And Effects
Layer styles and effects are the secret sauce in digital design, offering a powerful way to enhance your visuals. Whether you’re crafting a striking logo or polishing a photo, mastering these can dramatically change your work’s impact. Have you ever wondered how designers achieve those eye-catching designs? It’s often the clever use of layer styles and effects.
Applying Layer Styles
Applying layer styles can be a game-changer for your design projects. These styles include shadows, glows, and strokes that add depth and dimension to your layers. You can easily access and apply these effects through the layer panel.
Imagine you’re working on a text logo. Adding a drop shadow can give it an elevated look, making it pop from the background. Experimenting with different styles can lead to unexpected and creative outcomes. Why not try a subtle inner glow to give your text an ethereal feel?
Using Blend Modes
Blend modes are another tool to play with. They change how layers interact with each other. This can create unique effects that you might not achieve otherwise. Do you want your image to have a vintage look? Try using the ‘Multiply’ blend mode on a texture layer.
Blend modes can be complex, yet rewarding when understood. It’s like a puzzle where each mode has a different effect on your layers. Spend some time experimenting and you’ll uncover fascinating results. Have you considered how ‘Overlay’ or ‘Soft Light’ can transform your images?
Layer styles and blend modes aren’t just tools; they’re your creative playground. Use them to push boundaries and discover new possibilities. What unique effect will you create today?

Credit: lenscraft.co.uk
Introduction To Masks
Explore the basics of working with layers and masks to enhance your editing skills. Masks help control visibility and make precise edits. Understanding these tools is essential for creating polished and professional images.
Layers and masks are essential tools in graphic design and photo editing. They allow you to manipulate images with precision, creating seamless compositions and effects. Masks, in particular, are powerful because they let you hide or reveal parts of a layer without permanently altering it. This non-destructive editing technique can be the key to achieving professional results in your projects. ###What Are Masks?
Masks are like invisible sheets that sit on top of your layers. They let you control the transparency of different areas of a layer. By painting on a mask with black, white, or shades of gray, you dictate which parts of the layer are visible and which are hidden. Think of them as a way to edit without erasing. If you’ve ever regretted deleting something, masks are your best friend. They offer flexibility and can be adjusted at any time. ###Types Of Masks
There are primarily two types of masks you will encounter: layer masks and clipping masks. – Layer Masks: These are the most common. They let you hide or reveal parts of the layer they are attached to. This is ideal for blending images or creating cutouts. For example, you might use a layer mask to smoothly transition between two photos, creating a composite image. – Clipping Masks: These allow you to confine one layer to the boundaries of another. Useful for when you want a texture or effect to only apply to a specific shape. Imagine you have a text layer and you want to fill it with a pattern; a clipping mask would make this straightforward. Have you ever tried to create a complex design, only to feel overwhelmed by the details? Masks can simplify this process. They give you control over each element, allowing you to focus on creativity without worrying about mistakes. Next time you dive into your design software, experiment with masks. You’ll find they’re not just a tool, but an essential part of your creative toolkit.Using Masks For Design
Using masks for design can transform your artwork from ordinary to extraordinary. Masks allow you to hide or reveal parts of a layer, giving you control over what shows in your design. Imagine being able to tweak every detail, ensuring every element aligns perfectly with your vision. Masks provide that precision and flexibility, making them a powerful tool in your design arsenal.
Creating Masks
Creating masks is simpler than it sounds. Start by selecting the layer you want to mask. Click on the mask icon in your editing software. This will add a white mask thumbnail next to your layer. White reveals everything on the layer, while black hides it.
To adjust the mask, use a brush tool to paint black or white on the mask. Painting with black hides parts of the layer, and painting with white reveals them. If you make a mistake, simply switch the brush color to white or black and paint over it again.
Experiment with different brush sizes and opacity levels to achieve the desired effect. Masks let you adjust without permanently altering the layer, making it easy to try new ideas.
Masking Techniques
Masking techniques can add depth and interest to your designs. One popular method is using gradient masks. With a gradient, you can fade one image into another seamlessly. This technique works well for creating soft transitions or blending images.
Another effective technique is using masks for selective adjustments. If you want to change the color of only part of your image, mask that area and apply the color adjustment. This allows you to target specific sections without affecting the entire layer.
Think about how these techniques can elevate your designs. What unique effects could you achieve by using masks creatively? Consider experimenting with different approaches to see what works best for your projects.
Working with masks is all about precision. It’s about making your design exactly how you envision it. Whether you’re creating dramatic fades or subtle changes, masks offer a way to refine your work. Dive into the world of masks and let your creativity flow. What will you create today?

Credit: photoshopcafe.com
Advanced Layer And Mask Techniques
Advanced layer and mask techniques can elevate your designs. Understanding these methods allows for precise control. Mastering them enables complex edits and stunning visual effects. They play a crucial role in design workflow. Let’s explore some key techniques.
Clipping Masks
Clipping masks limit visibility to specific areas. They help focus on certain parts of the layer. You can create them by using the layer above as a reference. Clipping masks are ideal for enhancing textures and designs. They ensure no accidental edits spill over. This technique provides clean and professional results.
Layer Masks Vs. Vector Masks
Layer masks allow for gradual transparency changes. They are perfect for blending images smoothly. Vector masks rely on paths and shapes. They provide sharp and clean edges. Layer masks use grayscale adjustments. Vector masks use precise lines and curves. Both masks offer unique benefits for different tasks. Choosing between them depends on the desired outcome.
Best Practices
Mastering layers and masks in photo editing enhances creativity and precision. These tools help in non-destructive editing. Experimenting with layer opacity and mask refinement allows for seamless blending and adjustments.
Working with layers and masks can transform your design workflow into a streamlined and efficient process. Whether you’re a seasoned designer or a curious beginner, understanding the best practices can significantly enhance your creativity and productivity. Imagine being able to find any element in your project with ease or manipulate images without altering the original. These best practices are not just about efficiency; they’re about enhancing your creative freedom. ###Organizing Layers And Masks
Keeping layers organized is essential for maintaining clarity in your projects. Start by naming each layer descriptively. Instead of “Layer 1,” opt for “Header Image” or “Main Text.” Use folders to group similar layers together. For example, group all text layers in one folder and images in another. This makes it easier to locate specific elements when editing. Color-coding layers can also be a game-changer. Assign colors based on layer type or importance, allowing you to quickly scan through your layers panel and find what you need. ###Efficiency Tips
Efficiency in using layers and masks is crucial for a smooth workflow. Utilize shortcut keys to quickly switch between tools and actions. Familiarize yourself with these shortcuts to save time and reduce repetitive mouse clicks. Smart objects are your friends. Convert layers to smart objects to preserve the original data. This way, you can edit non-destructively, ensuring you can revert any changes if needed. Masks offer flexibility by allowing you to hide or reveal parts of a layer. Instead of erasing, use masks to maintain the option to adjust your edits. This practice not only saves time but also keeps your design options open. Think about your last project. How much time could you have saved with these tips? Implementing these best practices can transform how you manage layers and masks, making your design process not only faster but also more enjoyable.Frequently Asked Questions
How Do You Properly Use A Layer Mask?
To use a layer mask, select the layer in Photoshop. Click the “Add Layer Mask” button. Use the Brush tool to paint black for transparency and white for opacity. Adjust the brush hardness and opacity for precise control. Save your work to preserve the changes.
How Do I Combine Layers And Masks?
To combine layers and masks, select the layer, then apply a mask using the mask icon. Adjust the mask using the brush tool for precision. Merge layers by selecting them and pressing Ctrl+E or Command+E on Mac. This creates a single layer with the mask applied.
Why Are Layers And Masks Useful?
Layers and masks offer precise control over image editing. They allow non-destructive adjustments, enhancing creativity. You can isolate elements, apply effects selectively, and easily revert changes. This flexibility is crucial for professional and complex photo manipulations, ensuring high-quality outcomes.
Can Layer Masks Be Used On Adjustment Layers?
Yes, you can use layer masks on adjustment layers. They help control the visibility of adjustments. This feature allows precise editing by revealing or hiding parts of the adjustment. Layer masks enhance creativity and flexibility in photo editing software like Photoshop.
Conclusion
Mastering layers and masks improves your creative projects. They offer flexibility and control. Layers let you manage different parts separately. Masks allow precise edits without permanent changes. Experiment with both to find what works best. Practice regularly to enhance skills.
Understanding these tools boosts your confidence in editing. Keep exploring and learning new techniques. This helps you create stunning visuals. Remember, patience and practice lead to improvement. Happy editing!